
Texas Pit-Firing Tour 2019
Cultivated
A study of pit-firing with elements gathered throughout the State of Texas
Beginnings
When asked by a local archaeologist to create an ancient replica of sorts for demonstration purposes, I felt a bit out of my league but definitely up to the challenge. He asked that I process and utilize our local clay, coil-build a piece with minimal tools, then finalize the process with a pit firing. I was so excited yet felt so inexperienced when it came to those techniques.
I began researching and decided my first attempts would be with pots made from the high-fire stoneware I had grown accustomed to. My research led to an artist who not only creates coil-built pottery but pit fires them as well! I noticed her use of dried flower petals as some of the bedding in one of her firings and wondered if the dried flowers might possibly act as a natural colorant.
My dad has a large cast-iron grill that we figured would work for this type of firing. It would be large enough for several pieces to nestle under a mound of fire fuel then we would also have a built-in cover by lowering the lid overnight. My first few attempts in this enclosed container were successful, so I knew it was time to test materials in a ground pit. My desires to travel immediately took over as I was flooded with ideas of a road-trip, camping, 100 pots, selling on the side of the road, letting others get involved with the firings, and making videos. Naturally, those plans changed, but the objectives remained:
Create a large body of work
Test materials for firing effects (gathered in respective regions)
Inexpensive travel experience
Share body of work and findings with others
Apply findings to local, coil-built pieces


"Hey Friend, I'm thinking about a road trip through Texas! We can stay in State Parks, camp in a tent or in the car. I can take 100 pots and fire 10 at 10 different locations. We can eat noodles to keep it cheap! You in?"
Creating a Collection
I began by creating a collection. I usually work in small batches in my studio to insure a quicker turn-around between website uploads, but I wanted to see my shelves and kiln fuller for a change. I also have to create only what I can finish before they dry out in the heat.
I knew I wanted a variety of shapes, but as I thought more about what I was offering, I decided I would create three size categories as well. I enjoy a stand-alone piece of art, but sometimes displaying a set is fun too! I did have to monitor the size, however, due to limited space in my vehicle.
As time passed, I quickly realized I wouldn't be able to complete the 100 pots as initially dreamed. I found myself working nearly 30 hours of the week at another part-time job which limited my studio time. In the end, I made sure I had 52 to pit-fire. (That would leave one for each of the friends that helped, one for me from each place, and 45 to sell, right? ;) )
Each piece was burnished prior to the first firing so that the exterior would be smooth for polishing. I learned that any texture left from throwing or carving affects the final look and causes difficulty when polishing. The pieces were then placed upside-down for drying. Once dry, I bisque-fired to 1945°F/Cone 04 in my electric kiln. They could then be wrapped in copper or simply placed on a bed of sawdust in the pit for firing.
Since this particular collection was going on a road trip, I divided it into 5 groups for easier access and better organization along the way. I tried to have a variety of shapes and sizes for each location then decided on-site which pieces to wrap with wire.

A Hunka, Hunka Burnin' Texas Love
Lauren, one of my best friends since Jr. High and fellow road-tripper, and I calculated the days needed at each place for a firing (at least one day to fire and another to unbury), the locations we could possibly camp, have a fire, and potentially have different firing materials, then settled on the course. Whew!
Tentatively:
* Meet at College Station
* First Firing - Hill Country
* Second - Southern Texas/Mexico Border
* Third - South Padre Island
* Fourth - Middle Texas Coast
* Fifth - College Station/Hill Country
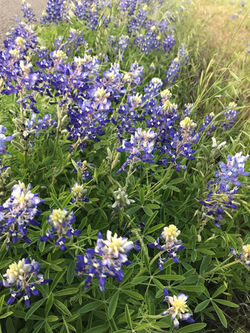
We planned to leave in mid-late March-- that way the bluebonnets would be in bloom and South Texas and the coast wouldn't be too hot or too cool. We loaded the pots, minimal clothing, an ice chest, a tent, sleeping bags, an umbrella, a couple chairs, reading materials (hardly used ;) ), some cleaning and cooking ware, and took off!


Firing Process
A pit-firing day was primarily about the firing. We could have easily awakened in a park or on the beach and chosen to explore all day or read and sunbathe, but we did have some priorities! Fire pots, and don't starve! Then explore, read, and sunbathe!
The fire pit was either already established for us, as was the case at the State Parks, or we chose the location on the beach and the private property in College Station. Lauren usually began digging the pit about 12" deep and 18"- 24" wide, depending on the location, while I prepped the pots. Once the chosen pieces were wrapped in copper wire, all the pots for a specific firing were placed in the pit on a few inches of sawdust.
Materials (wildflowers, interesting wood, fruit rinds/peels, nut shells) were either gathered while driving or at the beach. We placed them strategically around the pots, under, inside, or on top, then covered with sawdust, wood chips, chunks, and logs. The pit burned on average 3-4 hours, until everything had nearly turned to ash or embers, at which time it was covered to slowly cool overnight until the next day.
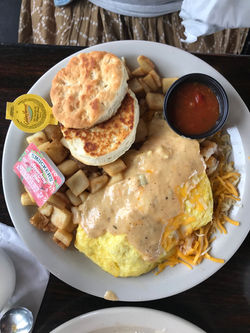
This was also the best opportunity to cook! Our disc served a dual purpose as we could utilize the hot pit fires for cooking veggies, squash, chicken, steak, bacon, eggs, and even pancakes, then invert the disc to cover the pit and seal in the heat. We usually began prepping the pit and pots around 10 or 11 am. Once the fire was lit, we could start the food prep since it took a bit of time to heat the disc anyway.
Typically, we tried to prepare food for a few days at a time. If we were only planning on having small charcoal grill fires for a few days, we knew we needed to prepare meals that could be reheated rather than cooked thoroughly on those fires. We also enjoyed a nice, hot meal, fresh from the disc during these times, so we took the much-needed break to enjoy the fruits, or vegetables rather, of our labor.
No fire was complete without marshmallows either! We made sure to work in a sugary reward of marshmallows with oatmeal, chocolate chip cookies.
It was usually mid to late-afternoon when we covered the pit. We had the evenings to clean, repack, read, enjoy the sunset, or explore. The pots weren't touched until the next day when they were excavated, analyzed, rinsed with water, allowed time to dry, then packed away again until I returned home.
 |  |  |
|---|---|---|
 |  |  |
 |  |  |
 |  |  |
 |  |  |
 |  |  |
Final Steps
Although the firings were complete during the trip, each piece had to go through a final evaluation and polishing once I returned home. Due to changes in our itinerary, I also had about 20 pots that still needed firing. I had a total of 4 firings in the Panhandle to finish the collection. Some pieces were fired multiple times in the Panhandle because I was so picky about the outcome. I then lightly sanded, if needed, and polished with two coats of paste wax and a soft cloth. They were now...finished and ready for display!
I knew I wanted the collection to be visible as a whole so those that were interested could see our process and how the various elements affected the firing outcome at each location.


Cultivated
Museum of the Plains
 |  |  |  |  |
|---|---|---|---|---|
 |  |  |  |  |
 |  |  |  |  |

Texas Hill Country
March 27 - 29, 2019

First Firing
Firing Ingredients:
5 Pots
Copper wire on one pot
Wildflowers: Bluebonnets, Texas Paintbrush, White Prickly Poppy, Bougainvillea, small yellow flowers
Pecan, walnut, almond, and peanut shells
Pink granite rocks
Salt, Sawdust, Wood Chunks, and Oak Logs
Estimated Firing Time: 4 hours
Results =
Lessons Learned:
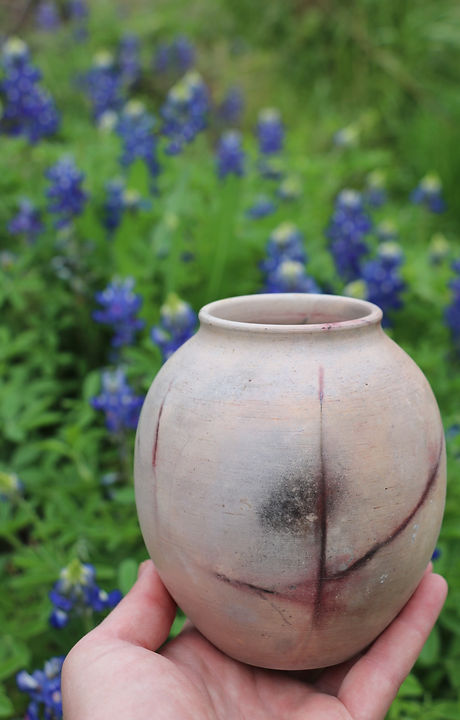
Only small patches of black on a few pots = need deeper bed of sawdust
Clay remained pink in color = fire not hot enough to alter clay properties
Small red dots from bluebonnets = YAY! More flowers next time!
Faint red lines from copper wire = YAY! That pot and wire got hot enough!
Oak logs took forever to catch fire and burn = Don’t use oak until fire matures enough to burn!

Bonus!
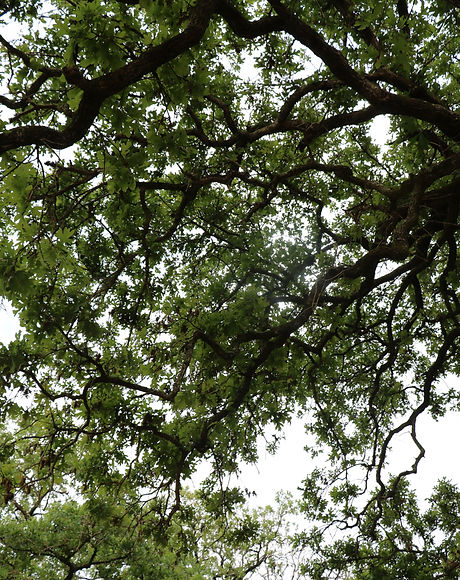
We enjoyed a beautiful drive from College Station to Fredericksburg before deciding on Enchanted Rock State Natural Area as our first camping location. The weather was gorgeous, with the exception of the fire-extinguishing wind the first night; thus, dinner was made with the small butane burner in the dark that evening. We witnessed beautiful sunsets and sunrises as well as lovely weather for a couple hikes through the pink granite rocks. Though the trash pandas tried all night to raid our cooler, they left empty-handed. (we kept the ice chest in the car after that so we could sleep a few more hours)
 |  |  |  |  |
|---|---|---|---|---|
 |  |  |  |  |
 |  |  |  |  |
 |  |  |  |  |

Garner State Park
March 29-31, 2019

Garner State Park was an opportunity to take the scenic route through the hill country, see another State Park, and minimize drive times between camping locations. We were able to book one night here because the park was FULL!

After seeing the beautiful Rio Frio, which happened to be a short 25 yards behind our campground, we decided to check first thing in the morning for cancellations. We wanted more time by the river! They had one site, so we happily packed and unpacked that day!

Had we known we would have two nights, we could have had a pit-firing, but Garner became a place of rejuvenation instead. We read by the river, soaked up the sun, saw a campsite being ravaged by buzzards, got strange looks as I pressed clay against a tree, and enjoyed the country music from the neighbors.
 |  |  |
|---|---|---|
 |  |
Choke Canyon State Park
March 31 - April 2, 2019

Second Firing
Firing Ingredients:
10 Pots, + 1 Additional for feather play
Copper Wire on Several pots
One pot covered in flowers and wrapped in foil
Wildflowers: Bluebonnets, Texas Paintbrush, small yellow flowers, Wild Heliotrope (purple)
Tea and coffee grounds
Orange peels
Chemicals on one side of pit
Salt, Sawdust, Wood chips and Chunks
Estimated Firing Time: 6.5 hours

Results =
Lessons Learned
Black and White variations = Deeper bed of sawdust helps!
Whiter clay body = Fire was hot enough!
Pot in foil still pinkish = Didn’t get as much heat?
Red patches from chemicals on some and flowers on others = WOOHOO! Use more flowers for concentrated color! Chemicals always work.
All black pots = Center of fire, completely submerged in embers, no white from air exposure
Feather play on pot outside of fire not too swell.

Camp Life.
"You get the whole campground to yourselves. Check-out is at 11am. Oh, and watch out for alligators!"
We awakened to the sounds of grackles and ducks. We fired pots and cooked for four hours to the sounds of a woodpecker and caracara, then we watched the sun set to a cacophony of bugs and grackles, followed by the dusk migration of ducks, then hooting of owls. We may not have had much out there on our own, but we most certainly commandeered the outlets/charging station in the restroom ;)
|  |  |  |  |
|---|---|---|---|---|
 |  |  |  |  |
 |  |  |  |  |
South Padre Island
April 2-4, 2019

Happy Birthday!
What a day to celebrate! We made it to the beach, my favorite, and that was just the beginning. We stayed in a hotel where we got nice hot showers and baths each of the three days. ;) We let others cook for us, and they cooked yummy, tasty seafood. PLUS, we didn't have to do the dishes! We pampered our skin and faces and ate delicious gelato for dessert followed by dark chocolate treats. Then, we each had our own bed! All those little things felt so great after a week in the wilderness.
Delicious Food!
Cap'n Roy's fried seafood, Pier 19's amazing Texas waffle, AND cinnamon roll--we got that for leftovers **shhh**, Sea Ranch's red snapper throats and oysters rockefeller, gelato, and breakfast at the hotel too! We were so excited about the food!


Always Collecting
We may not have been allowed to camp on the beach or even have a beach fire at South Padre, but that didn't stop us from collecting beach items for our next firing. We picked up flowers and palm husks while doing some laundry. We found some small shells and seaweed while walking the beach, and the best finds were hibiscus flowers and what we began calling "banana pods" outside the hotel. Don't worry, we only picked up what was already shed from the plant ;) However, I will gladly accept your dried, banana pod leaves! Send them my way!
 |  |  |
|---|---|---|
 |  |  |
 |  |  |
Padre Island National Seashore
Malaquite Beach
April 4-6, 2019
To-do:
Beachcomb ✔
Sunbathe ✔
Read ✔
Crab watch ✔
Reorganize Car ✔


Sustenance:
Oat pancakes with Almond Butter
Assorted Berries
Red Snapper Fish Tacos
Ice Cream (from a truck!) --dipped in Coffee Grounds ;)
Cinnamon Roll!
Excitement:
Camping on Grass ✔
Dunes covered in Fireflies ✔
Bioluminescent Dinoflagellates ✔
Generous Neighbors ✔
Shower/Bathroom ✔
Strange Neighbor 'Trump' ✔

 |  |  |
|---|---|---|
 |  |  |
 |

Padre Island National Seashore
South Beach
April 6-9, 2019

Third Firing:
Firing Ingredients:
12 Pots Total (4 with copper wire)
Bed and covering of Palm husks
Wildflowers: Thistles, Indian blanket flower, purple cone flowers, red and pink hibiscus, yellow tropical flowers
Banana pod leaves (beautiful burgundy hue & huge!)
Tea and coffee grounds
Sea finds: coquina shells, cockle shells, sea beans, barnacles, snail shells, seaweed, assorted discoveries 😉
Orange peels and avocado peels and seeds
Driftwood, Sawdust, Wood chips and Chunks
Estimated Firing Time: 3.5 hours

Results =
Lessons Learned
Disc-pit-covering kept pots safe through storm!
People were intrigued by how we spent our beach time. Hah!
All bottoms turned black = adding colorants underneath does nothing for color
Thick red lines from copper = double thickness helps, salt (seaweed) intensifies color
Deep reds = banana pods and hibiscus! AWESOME!
One patch of purple/eggplant hue = Red, Pink, and Purple flowers are best for color…in high concentration
Some items didn’t burn = sand pit extinguished fire at edges
Small black/gray spots = coffee grounds do something!

Life on the Island.
We had more time at this "campsite" than any other which gave us ample time to make it more of a "home". We witnessed the weekend crowd as well as the deserted weekdays. Our nights were fairly calm if one could remember the waves weren't the wind! We had the stormiest morning during which we watched everyone else evacuate. We brought out the deck of cards instead ;) The birds were the constant so we learned each bird call as well as their schedules! Restrooms were a mile away. Imagine sunrises and sunsets with sunny days in between :0
"That guy's car is covered in Trump 2024 stickers and seals! He even looks like Trump!"
Later, we saw him zoom past us on South Beach with his raft tied to the top of his car. "There goes Trump. He must've gotten tired of the home-schooled kids at the campground. Oh my gosh, the birds look like Trump! Trump birds!"
 |  |  |  |  |
|---|---|---|---|---|
|  |  |  |  |
 |  |  | |  |
 |  |
Padre Island National Seashore
Malaquite Beach (Again)
April 9-11, 2019

Again?
1. Our island park pass was good for a week, so why pay for elsewhere?
2. We liked this campground, the facilities, and the beach.
3. Other beaches weren't open for camping or didn't allow firing, so again, why not?
4. This time we were given sun and wind instead of clouds and mist!

Adventures!
One of the regular island-goers told us we should check out the bay side to meet some windsurfing hotties! HAHA! We ended up seeing a flock of white pelicans and what we dubbed "black beard trump birds" and also rescued a turtle from the road. She also told us the shells on the beach get better the further south one goes. So we took a late-night drive at low tide then went again during daylight on the windiest day to beachcomb.

Hospitality.
Had we needed anything at this campsite, I think our neighbors would have been happy to help. One offered to let us camp on her site if capacity was full. This same one found us on the beach to return what she thought was a lost phone. She was then concerned about us sleeping in the car on the windy night! (we didn't; we were just up early) Another offered to let us use her kitchen to cook since it was so windy!
 |  |  |
|---|---|---|
 |  |  |
 |  |
Last Leg
We made it through the trials and adventures of camping. It was now time to complete the loop to College Station. We enjoyed book-ending the journey with a What-a-burger breakfast then casually strolled through the South Texas Botanical Gardens and Nature Center in Corpus Christi.


College Station- Hill Country
April 11-13, 2019

Fourth Firing
Firing Ingredients:
12 Pots total (5 with copper wire)
Wildflowers: Bluebonnets, Texas Paintbrush, shades of pink and red phlox
Tea and Coffee grounds
Orange peels
Chemicals used sparingly on select pieces
Salt, Sawdust, Wood Chips and Chunks
Estimated Firing Time: 3.5 hours

Results =
Lessons Learned
Lots of black, some entirely = buried too deep, covered with too many embers
Metallic black = REALLY HOT fire!
Orange sections = really hot copper wire and orange peel
This final firing didn't involve camping due to the weather, but it did involve friends, food, and marshmallows ;)
Traveling Pit-fire Takeaways:
Need deep bed of sawdust but not too deep.
Copper wire can be used thin or thick
Purple and red hued flowers work best
Orange peels can intensify color
Salt helps with heat and color…see Third Firing
Make sure fire covers entire pit of pots so they retain heat and mature
 |  |  |
|---|---|---|
 |  |  |
 |  |  |

Texas Panhandle
Home Firings April 13 - June 29, 2019

Fifth Firing
April 19, 2019
Firing Ingredients:
10 Pots (refired all but 3 in Sixth Firing)
4 wrapped in copper wire
Wildflowers: Bluebonnets, Texas Paintbrush, pink wildflowers gathered along drive home, Pink phlox, Yellow roses, Pink and Red roses, sedum flowers, cotton bolls, various dried flowers given as donation and collected
Coffee grounds
Orange peels
Salt, Sawdust, Wood Chips and Chunks
Estimated Firing Time: 3 hours

Results =
Lessons Learned
Some lines from copper wire, few red = fire not hot enough
More brown on both outside and inside of pots = results of smoking, fire not hot enough to eliminate smoke marks, not sealed well-enough?
Tiny brown spots = coffee grounds
Brown underside rather than black = burned outer sawdust but not enough material underneath to keep heat and burn black?
Maybe laying closer together will help with heat retention

Sixth Firing
April 27, 2019
Firing Ingredients:
20 pots (including giant)
8 wrapped in Copper, Giant had steel wool
Bluebonnets
Red, Yellow and Pink Roses, baby’s-breath, cotton bolls, rhubarb blooms, fresh cut grass, sedum flowers
Orange peels, avocado peels
Turbinado Sugar, Salt, Wood chips and chunks
Copper carbonate and potassium carbonate on sections and some during firing
Estimated Firing Time: 3 hours

Results =
Lessons Learned
Some pinkish pots = not hot enough for long enough
Gold spots/sections = copper wire got hot enough!
Lots of red = copper carbonate worked!
One section with large red marks that almost look painted = maybe the wet grass had a strange effect? No green though.
Some grayish/brown on pots again = covered too soon or not soon enough?
Some pots nearly all black = too deep in kindling!
Giant pot really red = copper carbonate added during firing provided color

Seventh Firing
June 19, 2019
Firing Ingredients:
6 pots (redo from previous firing)
2 wrapped in Copper Wire
Purple salvia flowers, Red and Pink roses, Pink Peony petals, assorted tulip petals from family friend, iris petals
Salt, Sawdust, Wood Chips and Chunks
Estimated Firing Time: 1.5 hours

Results =
Lessons Learned
Faint lines = not hot enough for copper to transfer?
Pinkish/Orange pots = clay didn’t mature
Yellowy/gold specks on Texas and pot = yellow flowers?, copper wire?
Not much black = not enough kindling underneath, not enough wood for deeper embers, too many flowers?

Eighth Firing
June 29, 2019
Firing Ingredients:
3 pots (redo from previous firing)
Wood.
Estimated Firing Time: 1 hour

Results =
Lessons Learned
Color contrast is more interesting than before = even just wood can create interesting designs


